Inside the MoonTrader Client
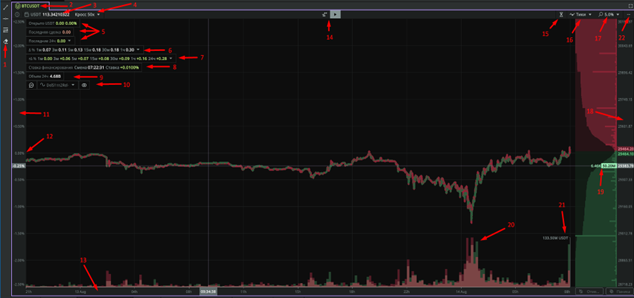
Top of the client

- Main Menu — The main menu allows the user to interact with the application, customize the layout, set shortcuts for trade related actions, reopen closed main tabs (those opened when the application is launched, except for the chart window), access the Application window profiles, resize the UI layout, etc.
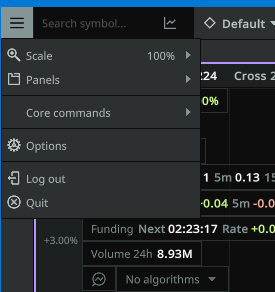
Scale — allows you to adjust the scale of the interface.
Panels — opens a tab if it was accidentally closed in the main interface.
Core commands — The main authority for managing the core on a remote server via the terminal.
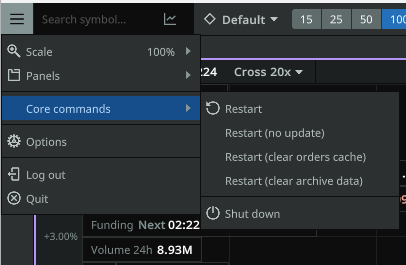
Restart (no update)- restart the core without installing updates.
Restart (clear order cache) — restart the core and delete the order base. For example, when a virtual order remains on the chart or in the Orders and Positions tab.
Restart (clear archive data) — restart the core and delete the market data archive.
Log out — opens the profile selection and editing window.
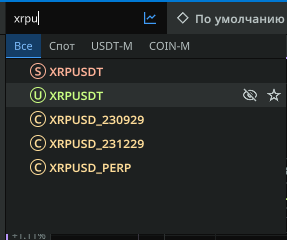
2. Market selection window: — when entering the desired pair of coins in the menu below will be displayed all the markets in which the desired pair is traded, double-click on one of the lines will open the corresponding chart. If you click on the crossed-out eye to the right of the asset, the highlighted market will be added to the client’s PM. Asterisk-adds the selected market to Favorites.
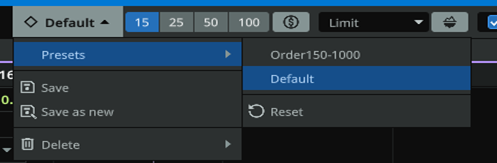
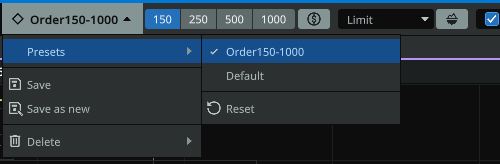
3. Presets Selection Menu: Allows the user to customize the order size, order type, Take Profit and Stop Loss sizes for different market situations.
4. MoonTrader has several methods for placing orders. Method 1 uses user-defined hotkeys by specifying key combinations to place a Buy or Sell order directly on the chart and customizing the parameters of the placed Buy/Sell orders using the following panels, which have the following components:
Order Size buttons can be selected by clicking on them, or edited by double-clicking and setting a custom value in the field.
- NOTE. In the futures market the order size is already specified INCLUDING the set leverage.

«Slider» allowing you to set the order size as a percentage of the total free deposit.

For details on how to switch the Slider Button, please refer to step 9 of this manual
It is also important to note that when the button mode is selected, the field values to be assigned by users are displayed in USDT equivalent regardless of the selected coin pair, this was done to make it easier for users to understand and estimate the amounts they will be trading. The application automatically converts the selected USDT amounts to the currencies used in the selected trading pair
- NOTE. Another method you can use to place an order on the exchange without using hotkeys is to use the order form to the right of the chart.
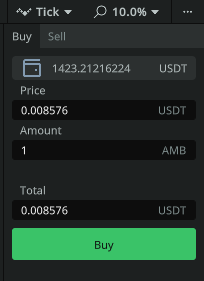
In this case, the user can manually set the price to place a buy or sell order on the exchange, set the Amount to be used, and then see the Total Value of that order.
5. Button to enable «Emulation» mode for manual trading — Allows the user to place virtual orders without using real funds. Emulation is sensitive to the volume traded in the order book on the exchange.
Example: The user has set the order size to 10,000 USDT the emulation order will be executed after the real volume equal to 10,000 USDT is traded on the exchange. This can be within one buy/sell at once for 10,000 or several 5,000+1000+3000+1000.

6. The order type selector allows the user to choose the types of orders that can be placed on the exchange:
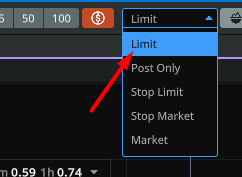
Limit — a type of order that can be placed regardless of the direction of the order (buy or sell) and the side of the order book (buy or sell side), i.e. if a user places a limit order to buy of this type. on the buy side of the order book, the exchange will accept the order and place it in its order book, and the order will await execution at the selected limit (level). If the user chooses to place a buy order of this type on the sell side of the order book, the exchange will accept the order but will execute it at the best price currently available, resulting in almost immediate execution.
Post Only — will allow the user to place orders only if the order goes on the order book before it is filled. Thus the user is eligible for the Maker Fee! If the user tries to place an order that upon execution will have the user pay a Taker fee, the order will be rejected by the exchange. To learn more about maker/taker fee, please refer to Binance documentation on the matter.
Stop Limit — allows placing an Order after a trigger price is crossed. Thus, when the user places a Stop-Limit order in MoonTrader Client, the actual order line that is drawn in the Order book is actually the Trigger Price level! When the price crosses that level, the Limit Order will be placed at the distance equal to the “Stop Price Percent” parameter of the Stop Limit order, away from the price (depending on the direction of the order, sell or buy, the actual limit order will be placed higher or lower in the order book).
Stop Market similar to a Stop Limit order but after the price crosses the Trigger Price set by the user in the Order Book, a Market price order will be placed and filled instantly. The spread parameter is not in use in this case.
Market — when placing an order of this type, it is immediately executed at the best current price.
7. Iceberg order button: when activated, hides the true order size by buying/selling with smaller and equal volumes. Allows the user to hide large volume orders in the order book. Enabled separately for new orders and Take Profit orders.

- NOTE. It is recommended to use Iceberg for orders of more than 5000 USDT. And at the same time activate Take Profit for new orders and orders to exclude incomplete sale of the traded asset.
8. An important feature of MoonTrader is the ability to manage risk with two fundamental tools: Take Profit and Stop Loss. The distance from the current market price can be set to % by entering a value from the keyboard in the field on the right. Depending on the user’s trading strategy, either of these parameters can be disabled for future orders.

9. Advanced order settings menu
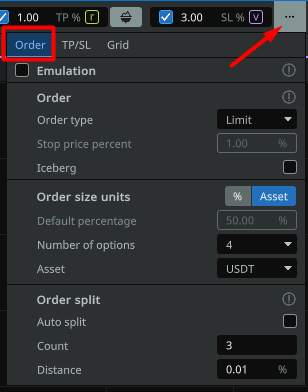
- Order tab:
Emulation — Button to enable «Emulation» mode for manual trading — Allows the user to place virtual orders without using real funds.
Order Type — allows the user to select the types of orders that can be placed on the exchange.
Stop price percent- used only with Stop Limit order. Defines the distance at which the Limit order will try to place when the price reaches the trigger price level set by the user in the Order book.
Iceberg — when activated, hides the true size of the order by buying/selling a smaller volume.
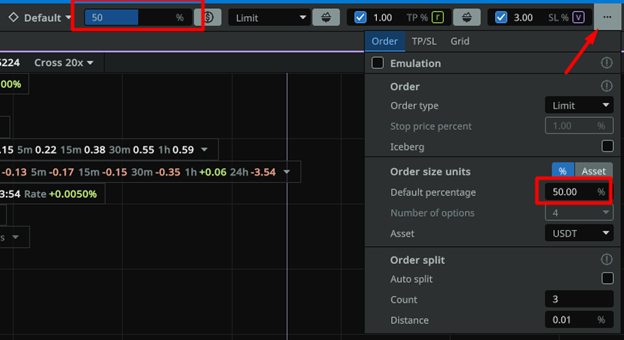
Order size units — settings for selecting how to place orders.
% — The user can customize the percentage of available deposit that will be used to place an order by sliding the slider or entering a numeric value in the Default Percentage field.
Asset — Order Size buttons can be selected by clicking on them, or edited by double-clicking and setting a custom value in the field.
Quantity — customizable number of order size buttons.
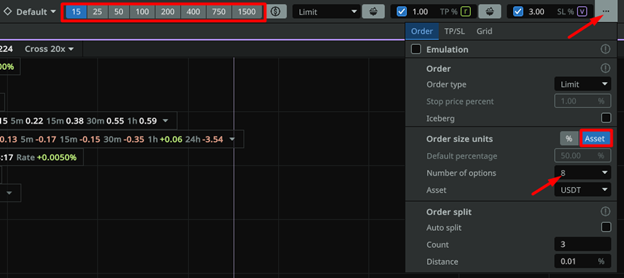
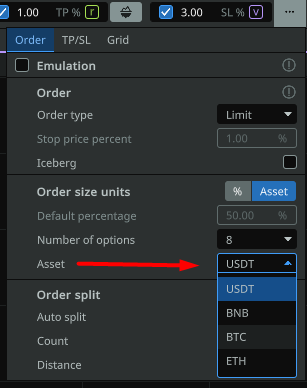
Asset — allows you to choose an underlying asset other than USDT.
Order split — automatic splitting of Take Profit/Stop loss when opening a position into several equal parts with customizable placement interval.
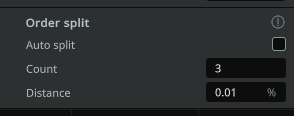
Count — configure the number of parts into which the Take Profit/ Stop Loss will be divided.
Distance — adjust the distance between split orders as a percentage of the original Take Profit order placement.
- TP/SL tab
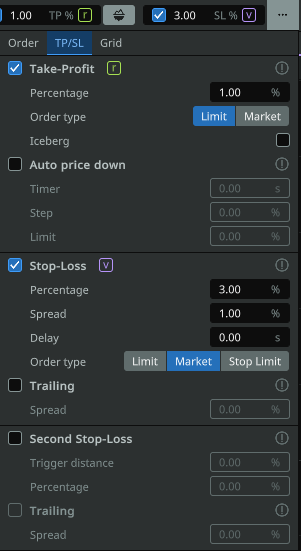
NOTE: Notice the green/purple “r” or “v” indicator which hints the user at what type of order will be placed: Virtual or Real.
Take Profit — enables or disables Take Profit orders and allows you to customize their values for new orders when trading manually.
Percentage — allows the user to set the distance at which TP orders will be placed. The values are given as a percentage of the current price. For example: if a LONG position is opened at an asset price of 100 USDT, TP 1% will mean that Take Profit will be placed at 101 USDT.
Order type — Take Profit order type:
Limit — places a limit order at a certain distance from the opening price (places a real order on the exchange)
Market — sets the market Take Profit at a certain distance from the opening price (places a virtual order only in the application!)
Auto Price Down- enables automatic lowering of Take Profit level towards the original entry point according to the following parameters:
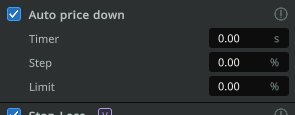
Timer — sets the delay in seconds until Take Profit starts to decrease to the current price (the same value will be used both for the first step and for all subsequent steps).
Step — sets the percentage value of the step of approaching Take Profit to the initial price.
Limit — the level to which Auto price down will lower Take Profit and stop. Limit values can be negative.
Stop Loss — allows the user to customize the distance at which SL orders will be placed for new orders when trading manually.
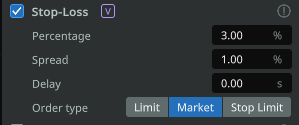
Percentage — sets the distance from the price (at which the order was executed) to Stop Loss in percent.
Spread – the distance from the order book spread at which a limit order will be thrown into the opposite side of the order book to ensure that the Stop Loss gets executed. E.g.: when the price touches the Limit (virtual) stop loss, the Take profit (real) is canceled and a real Limit type Stop loss order is placed inside the current order book spread PLUS a distance equal to the Spread value from the menu to ensure that the order will get executed. In case of a Stop Limit (real) Stop Loss, when the price touches the Trigger price of the order, which is displayed in the Client as a Yellow line, a real Limit order will be placed inside the current order book spread PLUS a distance equal to the Spread value from the menu to ensure that the order will get executed. If the price movement is too sudden, this operation will be repeated once every 60ms.
Delay — time in seconds that sets the Stop Loss setting delay.
Order Type:
Limit — when the price reaches the order level, a limit order will be placed in the spread. (virtual order, not visible on the exchange)
Market — a stop loss that will be placed as a market order and will be executed at the current market price when the price reaches the trigger line. (virtual order, not visible on the exchange)
Stop Limit — when the price touches the Trigger price of the order, which is displayed in the Client as a Yellow line, a real Limit order will be placed inside the current order book spread PLUS a distance equal to the Spread value from the menu to ensure that the order will get executed. If the price movement is too sudden, this operation will be repeated once every 60ms.
IMPORTANT: MoonTrader’s default setting is configured to place Take Profit orders on the exchange, and Stop Loss will be a virtual order. When using a Stop Limit SL, the Take Profit will be a virtual order.
Trailing — The function of shifting the stop loss to the profitable side, if the price has changed in a positive direction. (following the price)
Spread — a buffer that will ignore small price changes or price spread play and will only move the stop loss if the price has moved by a value greater than the Trailing Stop Loss Spread.
Second Stop Loss — Enables/Disables a special Stop Loss function that cancels the original Stop Loss and places a new one after the price moves in a profitable direction relative to the side of the position by a certain amount. Thus, if enabled, a second Stop Loss will cancel the original Stop Loss and, once price reaches the trigger distance of the second SL, place a new Stop Loss at a distance from this level equal to the Percentage parameter.
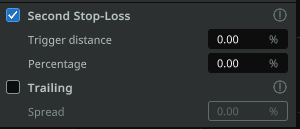
Trigger distance — the value in percent of price movement, into the profitable zone of a position, when reached, the old Stop Loss will be removed and a new Stop Loss will be placed at a distance from the current price equal to the “Percentage” parameter.
Percentage — distance in percent from the current price at the moment of Trigger execution to which the new Stop Loss will be placed.
Trailing – enables the possibility of the Stop Loss to trail the current price if the price moves into the profitable direction by the value set in the Spread. E,g,: if the price has moved into the profitable direction by 0.2%, the Stop Loss will move and be placed at a distance equal to “Percentage” from the new current price.
Spread — value in percent of price movement, in the opposite direction from the initial price. At which Stop Loss will follow the current price by the specified distance in the «Spread» parameter.
- Grid tab
Allows the user to place a grid of orders on the chart according to the following settings:
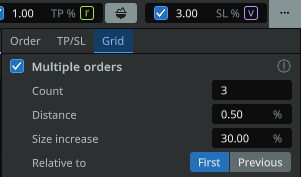
Count — sets the number of orders in the grid
Distance — sets the percentage distance between orders in the grid.
Size increase — increase of the size of each subsequent order in the grid. The value is specified in percent.
Increase relative to the First — if the «Size increase» parameter is set to 100 for example, each next order will be increased by 100% of the first order. Example — 100, 200, 300, 400.
Increase relative to Previous — each next order will be increased by 100% of the previous one. Example — 100, 200, 400, 800.
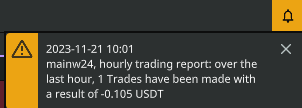
10. Notification window
Informs the user about issues and reports from the exchange or terminal settings, leverage changes, etc.
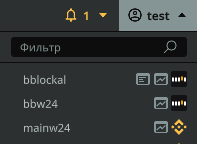
11. name of the current profile and menu for switching between profiles
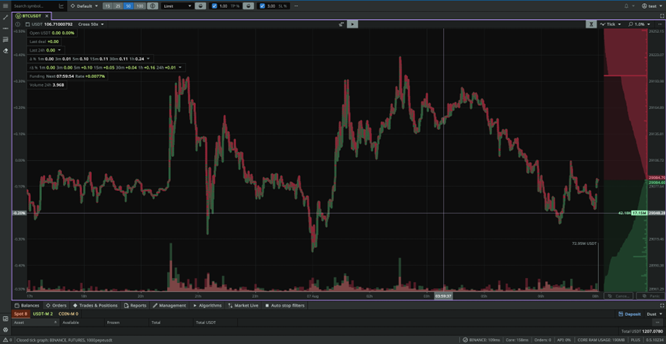
Graph window
- Drawing elements panel
- Tab with the name of the trading pair
- Available funds
- Type of margin used and leverage size
- Theoretical PNL of an open position, profit/loss of the last closed trade, profit/loss for 24h, for a core session or for the whole time.
- Absolute coin delta
- Relative coin delta (letter «r» next to the icon)
- Size and timer of the financing rate
- Coin trading volume per 24h
- Algorithm selection panel for profiling
- Percentage axis
- Zero level of the chart grid
- Time axis
- Price tracking on/off button (allows the chart to track the price movement) and chart stop button
- Button to enable/disable order history view
- Selector of chart type (tick, candlestick or mixed)
- Graph scale selector
- Price axis
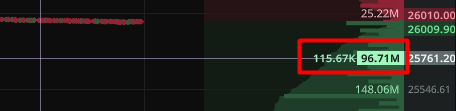
- The size of the largest order at the current price level and the total volume of orders from the spread to the current price level.
- Volume diagram
- Volume measurement scale
- Advanced graph settings:
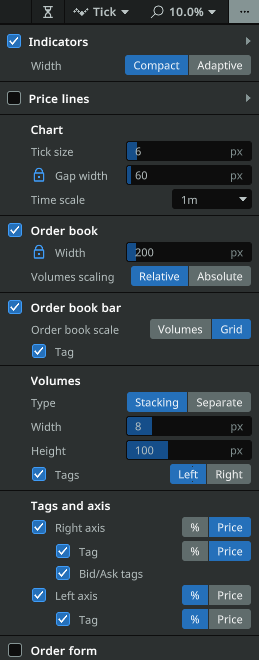
Indicators — allows you to enable/disable and customize the display of delta, PNL and other elements on the left side of the screen

Order Book — enable/disable display of the order book on the chart
Order Book width — select the width of the cup zone
Volumes scaling — allows to differentiate large limit orders (walls) in the order book
Gap width — allows you to customize the distance between the chart and the order book
Volumes — customize the appearance of vertical volumes on the chart
Tick size — sets the size of ticks on the chart
Order book scale — visually displays the volume of bids in the order book
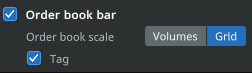
Volumes — underwrites the volume of large limit orders in the order book
Grid — underwrites volume at each level of the price axis
Tag — enables/disables volume display on the cursor. The first value is the size of the largest limit order at the current price level. The second value is the total volume of orders
Right/left axis — settings of the side of price and percent axis display, as well as tags on the cursor
Time Scale — allows you to select the visually displayed time period on the chart and time axis
Order Form — enables/disables displaying of order form on the chart
Price lines — settings for displaying marking price lines, tick price, liquidation price, etc. on the chart
Bottom of the client

1.Chart and panel layout settings (leeway). The user can customize the layout of chart windows, their number and necessary tabs.
2.Basic terminal settings window (see separate instruction)
3.Debugging window. Clicking it opens a pop-up window with the last actions, errors and warnings of the terminal.
4.Exchange Delay — displays the current delay between the core and the exchange.
5.Core Latency — displays the current latency between the client and the core.
6.Order counter — displays the current number of open orders.
7.API load indicator — when clicked, shows API load for each market type.
8.Resource Utilization Indicator — when clicked, displays the current resource utilization in the system where the core is running.
9.License Type Indicator — displays the user’s license type.
10.Version Indicator — displays the current client version (will turn RED if the core and client are not using the same application version)
11.Tabs